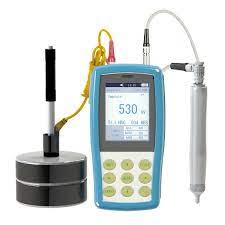
The UCI hardness tester is ideal for testing small items, objects with thin walls or complex form and the measurement of surface hardened layers. It can measure any metal material and complies with ASTM A1038.
Its non-destructive, ultrasonic design allows it to take measurements on tight spaces and challenging material geometries such as gear teeth flanks or root. The device also supports value conversion and offers a range of statistical functions.
What is an Ultrasonic Contact Impedance Tester?
Portable hardness testing using the UCI method is quick, easy and non-destructive. Unlike traditional Brinell, Rockwell, Vickers or Leeb methods that create a microscopic indentation, the UCI method measures the change in vibration frequency of the sensor rod.
FOERSTER offers mobile high-tech all-rounders for this application, the SONODUR 3. With a different hand or motor measurement probes and test loads, they can be used to determine comparative hardness values on metallic samples. This is also possible on positions that are difficult to access, such as tooth flanks or gear roots.
The test results are based on the measured increase in the vibration frequency of the sensor rod, which depends on the material and the coupling strength of the Vickers diamond with the sample. This is converted to a hardness value according to one of the main hardness scales. This makes the SONODUR 3 a versatile tool for the inspection of small fogging, cast materials and weld inspections as well as for formwork, presses, thin-walled structures and parts, bearings and tooth flanks.
How to Use Ultrasonic Contact Impedance Tester?
The UCI method is easy to use and does not cause any damage on the test sample. The measurement probe is positioned manually or motorized by the device and pushed onto the surface to be measured. The measured values are displayed in a matter of seconds and automatically saved digitally.
A non-destructive hardness testing method is especially useful for detecting defects in the production process. This can prevent expensive repairs and save thousands of dollars in lost production time and costs.
The ultrasonic contact impedance hardness tester can be used on a variety of different materials and products, such as small forgings, cast materials, welds, ion-nitrided stamping dies and molds, thin-walled parts, bearings and tooth flanks. The measurement results can be converted to all common hardness scales on the spot. This mobile hardness tester can also be used in areas where classic Rockwell, Brinell or Vickers hardness testing is not possible or impractical. This includes incoming goods inspections, quality assurance and production control of integrated components.
What to Expect from Ultrasonic Contact Impedance Tester?
Ultrasonic contact impedance hardness testing is a portable and simple-to-use nondestructive inspection method. It is ideal for small items, objects with a thin wall and complex shape, and surface-hardened layers.
This method uses a dynamic rebound impact device to measure the velocity of an impact against the material’s surface and correlates this data to a Leeb or Rockwell hardness value. It is highly accurate and can be used on a wide variety of metals.
A significant benefit of this method is that it can be performed in-process rather than after the item has been removed from a heat treat furnace. This reduces the time needed for a heat treatment process and can also eliminate delays in production schedules. Additionally, this type of test can be used on positions that are difficult to access, such as tooth flanks and the roots of gear teeth. This makes it a useful tool for quality assurance in the field.
Conclusions
The UCI method was invented by Claus Kleesattel and is based on the measurement of the frequency shift in the ultrasonic range when a mechanical resonator comes into contact with a surface. The device is movable and can be used where classic hardness testing (Vickers, Rockwell, Brinell) is not possible or impractical, for example in the case of incoming goods inspection, production control or maintenance on integrated components.
The mobile non-destructive test can be applied to any metal. It can also be used to measure positions that are difficult to access such as tooth flanks or the roots of gears. During the calibration process, the influence of the E-modulus, which is uniform for a material class, is compensated, using MPA calibrated steel hardness reference blocks. This creates an adjustment curve that makes it easy to calculate the Vickers hardness value from the differential frequency. It is thus a simple and quick alternative to classic hardness testing without the need to manually adjust the measuring device.

